


The Fogo system enables the creation and launching of various types of digital vouchers. To get started, go to Management > Marketing > Digital Vouchers and click on the Digital Vouchers Launch button. Before proceeding, it’s useful to determine details such as the campaign name, description, highlights, valid dates, regular value, discounted price, and issue period. Voucher campaigns can be tailored to target specific service categories like Chinese Medicine, acupuncture, and chiropractic practices.
Looking for your own digital voucher system? Sick of finding the match on your paper voucher? We got you!.
Fogo voucher benefits:
- Keep a good record of sold, redeemed, refund and expired voucher
- Create a voucher with customized value
- No paper, no print, no worries
- Unique voucher security code system to minimize mistakes
- Set expiry dates and number limit for your voucher
- Easy pause and edit function
- Easy duplicate for your next promotions
- Reduce marketing cost by direct to your client mobile phones or emails
- Keep a good record of sold, redeemed, refund and expired voucher
How to create your first digit voucher?
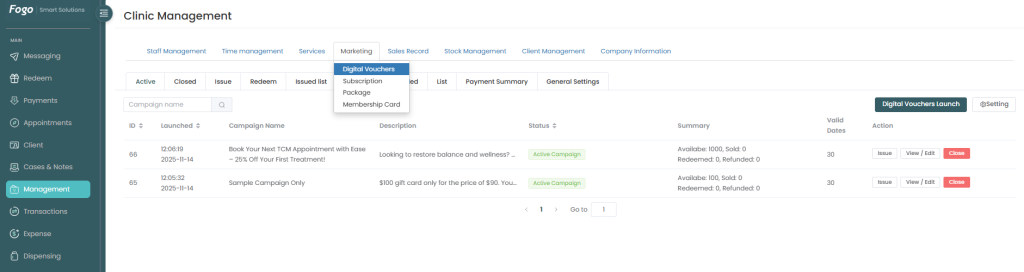
Step 1. Go to the left sidebar menu and click on Management.
Step 2. From the top tabs under Clinic Management, select Marketing. A dropdown menu will appear; select Digital Vouchers.
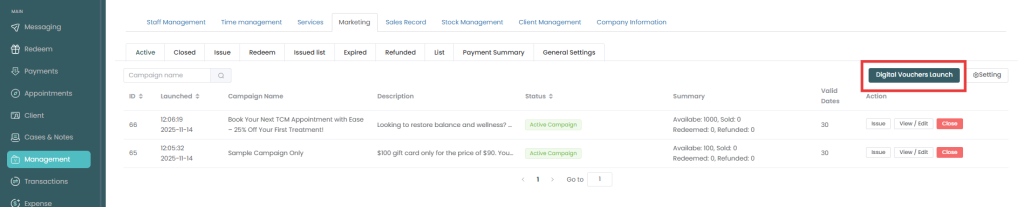
Step 3. Click the dark green Digital Vouchers Launch button on the right side of the screen.
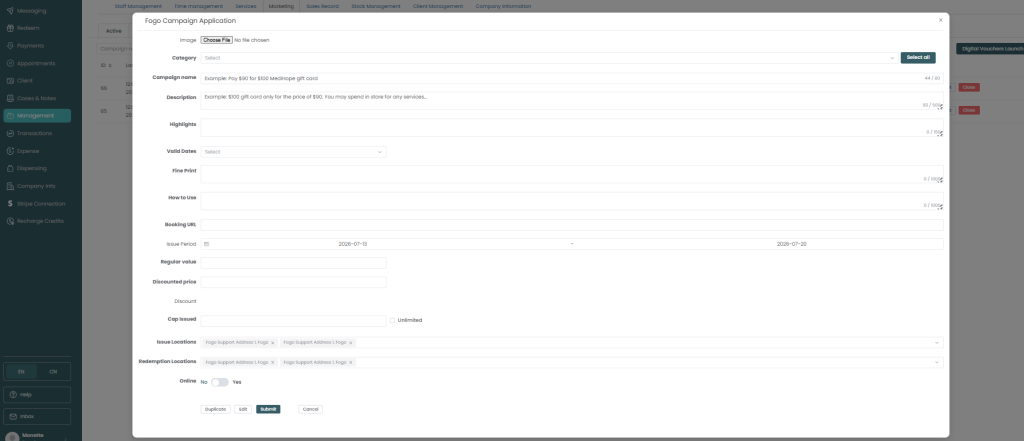
4. In the Fogo Campaign Application window that pops up, fill out the required details:
- Image: Click Choose File to upload a promotional banner or clinic logo.
- Category: Select the medical practices this voucher applies to (e.g., Chinese Medicine, Acupuncturist, Chiropractor).
- Campaign Name: Enter a clear, attractive title (e.g., “Book Your Next TCM Appointment with Ease – 25% Off Your First Treatment!”).
- Description: Detail the core purpose of your discount program or gift card.
- Highlights: Add quick-glance bullet points separated by arrows (e.g., Why Book with Us? > Expert Practitioners > Flexible Scheduling).
- Valid Dates: Set the number of days the voucher remains valid once acquired (e.g., 30).
- Fine Print: Outline the rules (e.g., Offer valid for new clients only, cannot be combined with other promotions).
- How to Use: Provide step-by-step instructions for the patient on how to redeem their voucher.
- Booking URL: Input the specific link where customers go to schedule an appointment.
- Issue Period: Define the open dates during which this promotion can actively be distributed.
- Pricing Section:
- Regular Value: Enter the original price of the service (e.g., 100.00).
- Discounted Price: Enter what the client pays (e.g., 75.00). The system will automatically calculate the final price matrix.
5. Review your settings and look toward the bottom of the long form to save it. (Note: If you ever need to temporarily halt or modify a live campaign, scroll to the bottom of the details page and click Pause / Edit).
In the Digital Vouchers Issue window:
Once a campaign is launched and listed as an Active Campaign, you can manually issue individual instances of the voucher directly to your clients:
- Look at your active vouchers list under the Active tab.
- Find the desired campaign name and look at the Action column on the far right. Click the Issue button.